 Claude
  Perplexity
How to Blacklist a Domain and Secure Your Inbox
Learn how to blacklist a domain to stop spam and protect your systems. Our guide covers Gmail, Outlook, cPanel, and smart alternatives for total security.
TL;DR: Learn how to blacklist a domain to stop spam and protect your systems. Our guide covers Gmail, Outlook, cPanel, and smart alternatives for total security.
Blacklisting a domain is about more than just tidying up your inbox. It’s how you put up a digital “No Trespassing” sign for all emails coming from a specific sender, blocking them from ever reaching you. Think of it as a necessary security move to shut down persistent spammers, phishing scams, and other malicious content from known troublemakers.
When and Why You Should Blacklist a Domain
Deciding to blacklist a domain is a serious step, a proactive defense strategy rather than a simple cleanup. Sure, the “unsubscribe” button works great for legitimate newsletters you’ve grown tired of. But it’s completely useless against malicious senders who never planned on respecting your wishes in the first place.
That’s where blacklisting comes in.
You should pull the trigger on a domain block when you see clear red flags—the kind that scream “persistent nuisance” or, worse, “genuine threat.” Knowing what to look for helps protect your data, your business, and your own security from unwanted and often dangerous emails.
Key Triggers for Blacklisting
Not every annoying email needs the blacklist treatment. The real skill is telling the difference between aggressive marketing and actual malicious intent. From my experience, these are the scenarios where blocking is absolutely the right call:
- Persistent Spam: You’ve hit unsubscribe over and over, yet the emails from that domain keep flooding in. This is a dead giveaway that the sender is ignoring opt-out rules, which is classic spammer behavior.
- Phishing Attempts: These are the tricky emails designed to fool you into giving up sensitive info like passwords or credit card numbers. They often look like they’re from real companies but come from slightly-off or suspicious domains. Block them on sight.
- Malicious Attachments or Links: Got an email with an unexpected attachment (especially a .zip or .exe file) or a link to a weird-looking website? Don’t hesitate. These are common ways malware and ransomware get delivered.
This decision tree gives you a quick visual guide for when to block versus when a simple unsubscribe or delete will do the trick.
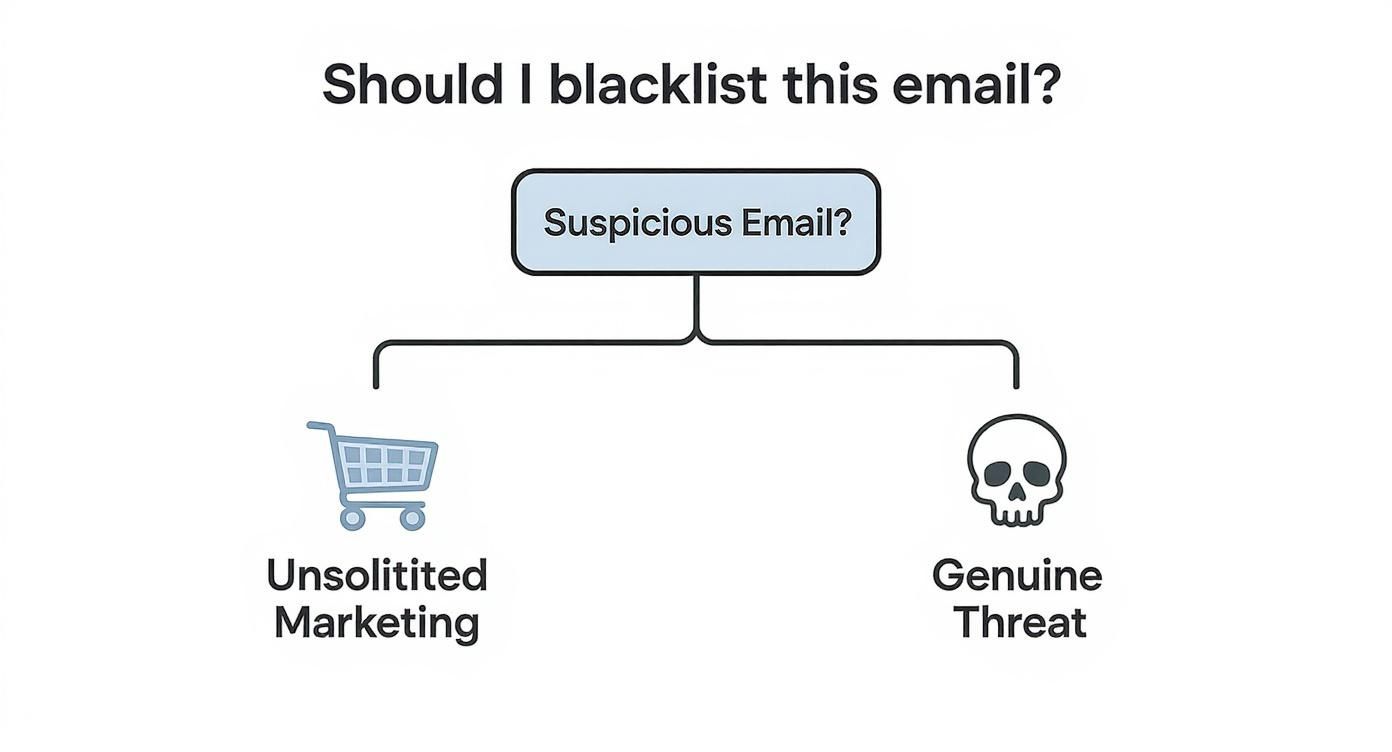
As you can see, there’s a clear fork in the road. Annoying marketing is one thing, but genuine threats demand a swift and decisive response like blacklisting.
Here’s a quick breakdown of different blacklisting methods and where they are most effective, from personal inboxes to server-level administration.
Comparing Domain Blacklisting Methods
| Blacklist Method | Best For | Scope of Impact |
|---|---|---|
| Personal Email Clients (Gmail, Outlook) | Individuals looking to block specific senders from their personal or work inbox. | Affects only your individual email account. |
| Server-Level (cPanel, Postfix, Exim) | System administrators needing to block domains for all users on a server or network. | Server-wide; protects every email account hosted on that server. |
| Third-Party Spam Filters (SpamAssassin) | Businesses and individuals who want advanced, customizable filtering rules beyond what standard email clients offer. | Can be applied at the individual, group, or server level, depending on the setup. |
| Marketing Platforms (Mailchimp, HubSpot) | Marketers who need to prevent sending emails to specific domains (e.g., competitors, known spam traps). | Outbound only; stops your platform from sending emails to the blacklisted domain. |
Each method serves a different purpose, so picking the right one depends on whether you’re protecting yourself or an entire organization.
Protecting Your Digital Identity
Blacklisting is more than just stopping a single annoying email. It’s about cutting ties with a source known for bad behavior. With malicious domain registrations on the rise globally, this has become an essential defense tactic. ICANN’s own analysis shows that a huge chunk of harmful online activity comes from these bad-faith domains, which makes proactive blocking so important.
A domain with a poor reputation is a massive red flag. If a sender is constantly spamming or sending malicious content, their sender score plummets, making them a prime candidate for your blocklist.
At the end of the day, a well-kept blacklist acts like a personal firewall you’ve customized based on your own experiences. It helps maintain a safer digital space, can indirectly improve your own email sender reputation score by keeping your inbox clean, and gives you the peace of mind that comes from knowing you’ve shut the door on a potential threat.
Blocking Domains in Your Personal Email
We’ve all been there. Your personal inbox feels less like a communication tool and more like a battlefield against endless junk mail. When the same annoying senders just won’t quit, it’s time to go on the offensive. Thankfully, both Gmail and Outlook give you the power to blacklist entire domains, effectively shutting the door on them for good.
This isn’t about just marking one message as spam; it’s about telling your email client that you never want to see another message from that source again. It’s a simple, direct, and incredibly satisfying way to reclaim your inbox.

Let’s dive into how you can put a stop to this nuisance, starting with the most popular email client on the planet.
How to Blacklist a Domain in Gmail
Gmail gives you two solid options for dealing with unwanted domains: a simple “Block” button and a more powerful “Filter” system. Which one you use really depends on the situation.
If you’re just getting a one-off email from a single annoying address, the block feature is your quickest win. Just open the email, click the three-dot menu next to the reply arrow, and hit ”Block [Sender Name].” Easy. Future messages from that exact address will now land straight in your spam folder.
But we know spammers are rarely that simple. They often cycle through different addresses from the same domain, like promo1@junk.com and deal-of-the-day@junk.com. To cut them all off at the source, you need to create a filter. It’s the only way to stop the entire domain.
Setting Up a Domain-Level Filter
- First, click the little slider icon on the right side of the Gmail search bar to open up the advanced search options.
- In the “From” field, you’ll type
*@unwanteddomain.com. That asterisk is a wildcard—it tells Gmail to catch anything coming fromunwanteddomain.com. - Click ”Create filter.”
- A new screen will pop up with actions. The most decisive one is to check the box for ”Delete it.”
- Click ”Create filter” one last time to lock it in.
My personal favorite tip: Using the “Delete it” filter is the ultimate power move. These emails won’t just go to spam; they’ll be vaporized before you even know they existed. It’s the key to a truly clean, distraction-free inbox.
This set-it-and-forget-it approach is perfect for those relentlessly pesky marketers or spammers. You take care of it once, and they’re gone for good.
Blocking Senders in Outlook
If you’re an Outlook user, you have a very similar set of tools at your disposal, primarily through the “Blocked Senders” list. The process is just as direct.
The quickest method is to right-click on an offending email right in your inbox. From the menu that appears, hover over Junk and then click Block Sender. This adds that specific email address to your naughty list, and future emails from them will be sent to the Junk folder.
But just like with Gmail, a smarter spammer will use multiple addresses. To block their entire operation, you need to add the whole domain to your Blocked Senders list.
Adding a Domain to Your Blocked Senders List
- Go to the Home tab in Outlook and find the Junk dropdown menu in the “Delete” section.
- Click on Junk E-mail Options.
- In the window that opens, switch over to the Blocked Senders tab and click the Add button.
- Here, you’ll simply type in the domain you want to block (for instance,
spamdomain.net) and hit OK.
That’s it. Any email from any address at spamdomain.net will now be automatically rerouted to your Junk Email folder, keeping your main inbox focused on what actually matters.
Blocking Domains Across Your Entire Server

If you’re managing a business network or a web server, blocking domains one user at a time just isn’t going to cut it. It’s wildly inefficient. This is where you bring in the heavy machinery: server-level blacklisting. Think of it as a single, powerful shield that protects every single person in your organization.
Instead of playing a never-ending game of whack-a-mole with spammers hitting individual inboxes, you create a central blocklist. This stops malicious emails from ever getting a foot in the door. It’s a much smarter, more proactive way to handle security for everyone, shifting from individual defense to a collective one.
The Easy Way: Using cPanel for Centralized Blocking
For most admins, cPanel is the familiar hub for managing web hosting, and it has some great built-in tools for this exact purpose. Your go-to feature here is Global Email Filters, which lets you create rules that apply to every single email account hosted on your server.
Here’s the rundown for setting up a server-wide domain block:
- First, head over to the Global Email Filters area in your cPanel dashboard.
- Click Create a New Filter. Give it a descriptive name you’ll recognize later, something like “Global Domain Blocklist.”
- Under the Rules section, you’ll set the first dropdown to From and the next one to contains.
- In the text box right next to it, pop in the domain you want to nuke (for example,
persistent-spammer.com). - Now for the Actions. I recommend choosing Discard Message. This simply deletes the email on arrival, no bounce-back, no fuss.
- All set? Click Create, and your new rule is live.
The real beauty of this is its set-it-and-forget-it nature. A new hire starts next week? They’re automatically protected by this filter. No manual setup is needed on their end.
For the Pros: Advanced Mail Server Configuration
If you’re someone who lives in the command line or just doesn’t use cPanel, you can get your hands dirty and configure the mail server software directly. We’re talking about the engines that actually handle email delivery, like Postfix and Exim.
- Postfix: With Postfix, you’ll typically edit the
main.cfconfiguration file to point to a separate blacklist file. This file is just a straightforward list of domains to reject. It’s a clean and powerful way to manage blocks right at the source. - Exim: Exim uses something similar called Access Control Lists (ACLs). You can configure these ACLs to deny mail from any domains you specify, giving you a ton of flexibility for different scenarios.
This direct approach definitely requires shell access and a comfort level with your server’s environment. But for that effort, you get the absolute highest level of control over your email traffic.
A Word of Caution: Handle With Care
A server-wide blacklist is an incredibly powerful tool, but with great power comes… well, you know. A single typo can cause a massive headache. Imagine you meant to block a spoofed domain like paypa1.com but accidentally blocked paypal.com instead. You could cut off critical payment notifications or client communications in an instant.
The effectiveness of any blocklist hinges on careful, ongoing management. This is more critical than ever, especially as automated threats are on the rise. In fact, one recent report found that a jaw-dropping 97.2% of domains don’t have full protection against bot-driven attacks. This really highlights why a well-managed blocking strategy is non-negotiable. You can read more about what DataDome calls the “AI traffic crisis” and see why this matters.
So, my advice is simple: always, always double-check your entries. Make it a habit to review your blocklist periodically to ensure it’s still accurate and relevant. This small bit of diligence can prevent major communication breakdowns and keep your blacklist a protective asset, not a self-inflicted liability.
Smart Alternatives to Permanent Blacklisting
While it feels good to blacklist a domain that’s been a constant pain, hitting the permanent block button isn’t always the sharpest tool in the shed. For businesses and email marketers, it can be a blunt instrument, potentially burning bridges or closing the door on future opportunities.
Sometimes, a more subtle approach gets you better results without the finality.
Enter the suppression list. In the world of email marketing, this is your intelligent, internal “do not contact” list. It’s a far more strategic way to manage your sending.
When someone unsubscribes or you want to avoid sending to a certain domain (like a competitor), you add them to your suppression list. Your marketing platform then knows not to send them anything. This protects your sender reputation and respects people’s wishes without making it a permanent, irreversible block.
Proactive List Hygiene Over Reactive Blocking
Honestly, the best strategy is a preventative one. Instead of waiting for spam complaints to pile up, get into the habit of practicing good email list hygiene. Think of it like regular maintenance on your car—it keeps things running smoothly and helps you avoid a major breakdown down the road.
Regularly scrubbing your lists to remove invalid or inactive subscribers is a game-changer.
A clean list means better deliverability and a stronger sender reputation. You’ll see lower bounce rates and fewer spam complaints, which are huge signals that internet service providers (ISPs) use to decide if you’re trustworthy. Making sure your technical setup is solid is also part of this. To get the full picture, take a look at our guide on what is email authentication and how it all ties together.
Proactive list hygiene isn’t just a cleanup task; it’s a core business strategy. A well-maintained list ensures your message lands in front of an engaged audience, maximizing ROI and protecting your brand.
The Bigger Picture of Online Reputation
Managing who you email is just one piece of the puzzle. With over 368.4 million registered domains out there, the digital world is noisy and competitive, making reputation management more important than ever.
Beyond just blocking domains, managing your online presence often requires a lighter touch. In some situations, you might even need to figure out how to remove negative search results to keep your brand’s image clean.
Ultimately, whether you’re blocking threats or carefully managing your outbound messages, the goal is the same: creating a safe and effective digital space. By choosing smarter alternatives to a hard blacklist, you stay in control while keeping your options open.
How to Check and Reverse a Domain Blacklist

So, you’ve either blocked a domain by mistake or, worse, found out your own domain has been flagged somewhere. Take a deep breath. It’s a fixable situation, but you need to be methodical. The first step is confirming the block, and from there, you can follow a clear path to get things back to normal.
This really boils down to two different scenarios: undoing a block you put in place yourself, or getting your domain removed from a public blacklist. Each path is a bit different, but they both start with a little detective work.
Undoing Your Own Domain Blocks
It happens. A slip of the mouse, and suddenly you’ve blocked a key client or a service provider you rely on. Communication grinds to a halt, but reversing the damage is usually pretty simple. For the most part, you’re just retracing your steps.
In Gmail or Outlook
- For Gmail: Head back into your filter settings. Just find the rule you created that’s blocking the domain, select it, and hit Delete. Poof. The block is gone.
- For Outlook: You’ll want to go into your Junk E-mail Options and click over to the “Blocked Senders” tab. Scroll through the list to find the domain, click it, and then press the Remove button.
On a Server with cPanel
If you set up a server-wide block, you’ll need to go back to Global Email Filters inside cPanel. Find the filter you set for that domain, and just like with Gmail, you can delete the rule entirely. This lifts the block for every user on your server.
My Domain Was Blacklisted, Now What?
That sinking feeling when you discover your own domain is on a blacklist is rough, especially when you see your email deliverability tank. This often happens if an account gets compromised or if sending habits start looking spammy to automated systems. Your first move is to check the major DNS Blacklists (DNSBLs) to see who has flagged you.
Plenty of free online tools can check your domain against dozens of the most common blacklists all at once. This will give you a quick, clear picture of how widespread the problem is.
Identifying which blacklists have flagged you is only half the battle. You absolutely must fix the root cause. This could mean securing a hacked email account, scrubbing your mailing list of bad addresses, or properly setting up your email authentication. If you ask to be delisted without fixing the underlying problem, you’ll almost certainly be rejected.
Once you’ve cleaned up your act, go directly to the website of each DNSBL that listed you. Every blacklist has its own delisting process, which typically involves filling out a removal request form. Be prepared to wait—it can take anywhere from a few hours to a couple of days. For a more detailed guide, check out this in-depth walkthrough of the email blacklist removal process. It’s crucial for making sure your legitimate emails land in the inbox again.
Frequently Asked Questions About Domain Blacklisting
It’s natural to have questions when you start blocking domains. Whether you’re a business owner trying to keep your team’s inboxes clean or just someone tired of spam, getting the details right is important.
Think of this as your quick-reference guide. I’ll walk you through the most common questions people ask, covering everything from how permanent a block is to what the sender actually sees on their end.
Is Blacklisting a Domain Permanent?
The short answer is: it depends on how you blocked it.
If you set up a block in your personal Gmail or Outlook account, you’re in complete control. That block is only “permanent” until you decide to go back into your settings and remove it. The same goes for server-level rules you might set up in cPanel—you put them there, and you can take them away just as easily.
Now, landing on a public DNS Blacklist (DNSBL) is a whole different ballgame. Getting off one of those lists isn’t impossible, but it’s not a simple click of a button. It usually involves a formal delisting process where you have to prove you’ve fixed whatever problem got you listed in the first place.
Will the Sender Know I Blocked Them?
Usually, no. When you block a domain through your email client or a server-side filter, the standard action is to just “discard” or “delete” the incoming message. The sender gets no bounce-back or notification at all. From their end, it just looks like the email was delivered successfully, but it never actually hits your inbox.
This is actually a feature, not a bug. It prevents spammers from figuring out which email addresses are active. If they got a bounce-back, they’d know your address is live and would likely just try again from a different domain.
While some server rules can be configured to “reject” a message and send a notification, silently discarding it is far more common for personal and most admin-level blocks.
Can I Block a Specific Subdomain?
Yes, absolutely. This is a fantastic way to get more granular with your filters.
Let’s say you get useful emails from company.com but are tired of the constant marketing blasts from deals.company.com. You don’t want to block the entire domain, just the noisy part.
In this scenario, you can create a filter that targets only the subdomain. In a Gmail filter, for example, you’d simply enter *@deals.company.com in the “From” field. This is a surgical approach that blocks the junk while ensuring you still get important messages from the main domain.
What Is the Difference Between a Blacklist and a Suppression List?
This is a crucial distinction, especially if you’re involved in email marketing. They sound similar, but they serve completely opposite functions.
A Blacklist is a defensive tool. You use it to stop unwanted external emails from coming in. Think of it as a shield protecting your inbox.
A Suppression List is an offensive tool used for your outbound email campaigns. It’s your internal “do not send” list, containing people who have unsubscribed or addresses that have bounced. You use it to avoid sending emails to certain people, which is vital for respecting user preferences and protecting your sender reputation.
In short, a blacklist protects you from others, while a suppression list protects your reputation from yourself.
Ready to stop worrying about bounce rates and sender reputation? Truelist offers pay-as-you-go credits that never expire, plus unlimited plans for high-volume senders, to ensure your messages always reach a real inbox. Clean your lists, protect your domain, and boost your engagement. Start validating for free today at truelist.io