
 Claude
  Perplexity
How to Configure DKIM for Flawless Email Delivery
Learn how to configure DKIM with this actionable guide. Get expert tips on key generation, DNS records, and verification to boost email deliverability.
TL;DR: Learn how to configure DKIM with this actionable guide. Get expert tips on key generation, DNS records, and verification to boost email deliverability.
Setting up DKIM correctly comes down to three main phases: creating a unique key pair, publishing the public half of that key in your DNS, and then making sure it all works. At its core, this process creates a digital signature that tells the world your emails are legitimate and haven’t been tampered with.
Your DKIM Configuration Roadmap
Before we get into the nitty-gritty, let’s look at the big picture. Think of this as your game plan. Each step logically follows the last, building a chain of trust that email providers like Google and Microsoft use to verify who you are. If you get one part wrong, the whole thing can fall apart, and your deliverability will suffer.
This visual gives a great high-level overview of how all the pieces fit together.
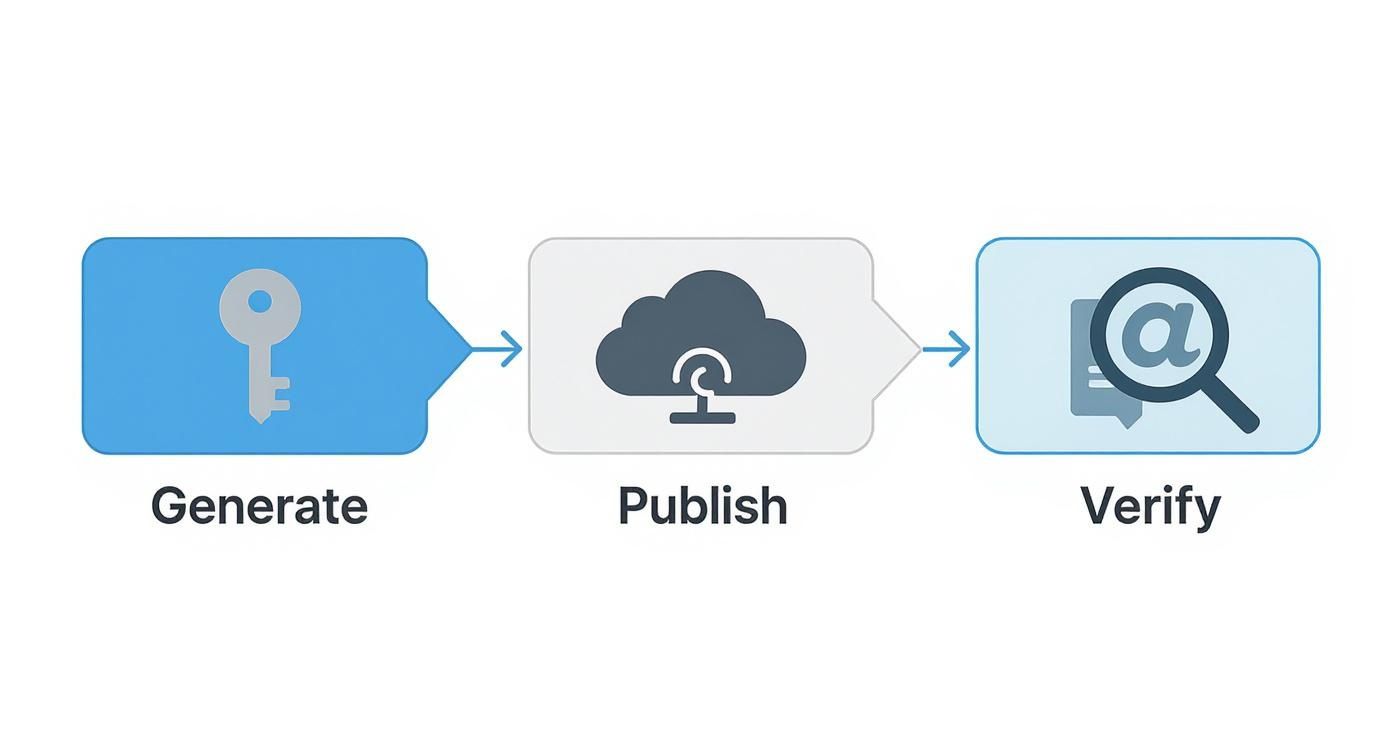
As you can see, it’s a straightforward path from creating your keys to getting everything validated.
Understanding The Three Pillars Of DKIM Setup
The whole process really boils down to three key actions. Each one is absolutely essential for getting DKIM up and running to protect your sender reputation.
- Generation: This is where you create the cryptographic keys. Your email sending platform—whether it’s Google Workspace or Microsoft 365—will generate a private key that it keeps secure and a public key that you’ll need for the next step.
- Publication: Here, you take that public key and publish it in your domain’s DNS records. It’s like putting a notice up on a public bulletin board, allowing any receiving email server to look up your key and confirm your emails are authentic.
- Verification: This is the final, crucial check. Once everything is set up, you need to confirm that email servers can actually find your public key and use it to validate your signatures. It’s the step that proves your hard work paid off.
To give you a clearer picture, this table breaks down the entire process from start to finish.
DKIM Setup At A Glance
| Phase | Primary Action | Why It Matters |
|---|---|---|
| Key Generation | Creating a unique public and private key pair using your email service provider. | The private key signs your emails, and the public key allows receivers to verify that signature. It’s the foundation of trust. |
| DNS Publication | Adding the public key as a TXT record to your domain’s DNS settings. | This makes your public key accessible to the world, allowing anyone to check the authenticity of your messages. |
| Verification | Using a diagnostic tool to confirm the DNS record is correct and properly propagated. | This final check ensures that mailbox providers can find and use your key, confirming that DKIM is working as intended. |
Getting this right is what separates the pros from the amateurs in the world of email deliverability.
The industry has certainly taken notice. Over 66% of senders are now aware they use both SPF and DKIM, which really underscores how critical these protocols have become for modern email security.
This isn’t just a “nice-to-have” anymore. With so many legitimate senders adopting these standards, mailbox providers expect to see them. If you want to learn more about how DKIM fits in with other protocols, check out this great guide on what is email authentication. Simply put, properly configuring DKIM is a non-negotiable part of being a trusted sender today.
Getting Your DKIM Keys Generated
This is where it all starts. To get DKIM working, you need to create a pair of cryptographic keys. One is a private key, which stays locked down on your server and signs every email that goes out. The other is a public key, which you’ll publish in your domain’s DNS for anyone to see. Nailing this first step is everything—get it wrong, and the rest of the setup won’t matter.
Thankfully, most modern email platforms like Google Workspace or Microsoft 365 have made this incredibly simple. They do all the heavy lifting in the background and just hand you the finished product. If you’re managing your own mail server or using a service that doesn’t automate this, a good DKIM record generator will get the job done.
The Great Debate: 1024 vs. 2048-Bit Keys
When you generate your keys, you’ll probably be asked to choose a key length: 1024-bit or 2048-bit.
Let me make this simple: always choose 2048-bit.
A 1024-bit key used to be the standard, but today it’s considered weak and outdated. Think of it as a basic padlock—it might stop a casual snooper, but a determined attacker can break it. A 2048-bit key, on the other hand, is like a bank vault door. It provides exponentially stronger encryption, which is what you need to build trust with receiving mail servers like Gmail and Outlook.
From my experience, switching a client from a 1024-bit to a 2048-bit key often leads to a noticeable bump in inbox placement. It’s a clear signal to mailbox providers that you’re serious about security.
Here’s a quick breakdown to help visualize the difference.
Comparing DKIM Key Lengths
Choosing the right key length is a critical decision for your domain’s security and email reputation. While 1024-bit keys were once acceptable, the modern standard is 2048-bit for its superior protection against brute-force attacks. This table contrasts the two options.
| Key Length | Security Level | Configuration Time |
|---|---|---|
| 1024-bit | Outdated. Vulnerable to modern cracking techniques. | Quick to generate and publish. |
| 2048-bit | Industry Standard. Offers robust, long-term security. | Takes the same amount of time to configure. |
Ultimately, there’s no real-world trade-off. A 2048-bit key takes no extra effort to set up but provides a massive security upgrade. It’s the clear choice for anyone serious about email deliverability.
A Real-World Example: Generating Keys in Google Workspace
If you’re running on Google Workspace, this process is built right into the Admin console. You just find the email authentication section and click a button to generate a new record.
Here’s what that screen looks like in the wild:
Google defaults to a 2048-bit key (good on them!) and lets you add a custom selector prefix. The selector is just a label that helps you keep track of different keys, which is handy if you send emails from multiple platforms (like your marketing tool, your CRM, and your main email server).
What To Do With Your Keys
After the generation process, you’ll be left with two critical pieces of information:
- The Private Key: This one is top secret. It stays with your email service provider and is used to create the digital signature for every email you send. Never, ever share this key with anyone.
- The Public Key: This is the one you’ll share with the world. It’s a long string of text that you’ll add to your domain’s DNS. Receiving servers use it to check the signature made by your private key.
Your provider will usually give you the public key neatly packaged in a TXT record format, ready for you to copy and paste. Your next job is to get this record into your domain’s DNS settings, which connects the dots and makes your DKIM signature verifiable.
Don’t underestimate the impact of this. Getting DKIM set up correctly has a huge payoff. We’ve seen businesses report that around 78% see better email deliverability, and authenticated emails can pull in up to 30% higher open rates. You can see more DKIM statistics that show just how much it can improve campaign results.
Publishing Your DKIM Record in DNS
You’ve got your public key in hand, and now it’s time to put it to work. The next step is publishing it as a TXT record within your domain’s DNS settings. Think of it like listing your business in a public directory—it’s how receiving mail servers can find and confirm your identity.
Before jumping into your DNS panel, it helps to have a solid grasp of how domain ownership is managed. Understanding the information stored in the WHOIS Database gives you context for why these DNS changes are so critical and where they fit into the bigger picture.
To get started, you’ll need to log into your domain registrar (like GoDaddy, Namecheap, or Cloudflare) and find the DNS management section. From there, you’ll create a new TXT record and paste in the public key from your email service.
Formatting Your DNS Record Correctly
This is the part where things can easily go wrong. The format of the DNS record needs to be exact, otherwise the entire DKIM setup will fail. Every record has three key components: the type, the name (often called the host), and the value.
- Type: This one’s easy—it’s always
TXT. - Name/Host: This is where you’ll use your selector. The format is
selector._domainkey.yourdomain.com. So, if your selector isgoogleand your domain ismybusiness.com, the host would begoogle._domainkey.mybusiness.com. - Value/Content: This is the long string of text that is your public key. You just need to copy the entire value your email provider gave you, which always starts with
v=DKIM1;.
Getting the selector name wrong is a surprisingly common mistake with massive consequences. I once worked with an e-commerce brand whose emails were inexplicably landing in spam. A quick audit revealed their selector was s1, but the DNS record was published as default._domainkey. It was a five-minute fix, but aligning the names instantly solved their deliverability nightmare.
The screenshot below from Microsoft 365 shows exactly what this looks like, providing the precise Host names and TXT values you’ll need.

You can see that Microsoft actually generates two CNAME records for its selectors, selector1 and selector2. These CNAMEs then point to the required DKIM information, which is a clever way for them to manage key rotation automatically on your behalf.
Setting the Time to Live TTL
Your DNS provider will also ask for a Time to Live (TTL) value. This simply tells other servers how long they should cache your record before checking for a new version.
When you’re first setting up DKIM, I always recommend a short TTL, like 3600 seconds (1 hour). This way, if you make a mistake, any corrections you make will show up much faster.
Once you’ve confirmed everything is working as it should, you can bump the TTL up to a longer value like 86400 seconds (24 hours) to ease the load on DNS servers.
Remember, DKIM is just one piece of the puzzle. For the best protection, it needs to work alongside other email authentication methods. Since you’re already in your DNS settings, it’s the perfect time to make sure your other records are set up correctly. You can learn more about how to https://truelist.io/blog/setup-spf-record, which is another crucial protocol for securing your domain.
Verifying Your DKIM Implementation
You’ve published your DKIM record, and you might be tempted to call it a day. But hold on—there’s one more crucial step: verification. You have to make sure it’s actually working. Skipping this is like building a car and never turning the key to see if the engine starts.

This final check is what turns your setup from a theoretical security measure into a practical tool that actively protects your sender reputation and improves deliverability.
Using Online DKIM Validators
The fastest way to get a quick thumbs-up is with a free online DKIM validator. These tools couldn’t be simpler. You just pop in your domain and the selector you used, and the tool does a quick DNS lookup to find and analyze your public key.
This simple test confirms two critical things:
- DNS Propagation: Is your new record actually live and visible on the internet?
- Record Syntax: Is everything formatted correctly? No sneaky typos or errors?
Getting a pass from one of these tools is a fantastic sign. It means the public-facing part of your configuration is solid and you’re on the right track.
Inspecting Raw Email Headers
For the ultimate proof, you need to see what the receiving servers are seeing. The best way to do this is to send a real email from your newly configured domain to an address you control, like a personal Gmail or Outlook account.
Once it lands in your inbox, don’t just read it—dig into the source code. Look for an option like “Show original” or “View message source.” This opens up the raw email headers, which are packed with diagnostic gold.
You’re hunting for a line that says Authentication-Results. If you see dkim=pass, you’ve done it. That’s the confirmation you’re looking for.
A
dkim=passresult is your ultimate proof of success. It means a major mailbox provider like Google has successfully located your public key, validated your email’s signature, and confirmed its authenticity.
On the flip side, a dkim=fail or dkim=neutral result tells you something’s wrong. The problem could be anything from a key mismatch to a problem with how your email provider is signing the messages. This header is the first place to look when troubleshooting.
Checking Provider Logs and Reports
Finally, don’t overlook the reporting tools your email service provider offers. Many also tap into data from major mailbox providers. Platforms like Gmail Postmaster Tools are incredibly useful, providing dashboards that show the percentage of your mail passing DKIM checks over time.
This data is invaluable for monitoring the long-term health of your email program. The importance of getting this right can’t be overstated. In the first 60 days of recent enforcement, Google saw a massive 65% reduction in unauthenticated messages reaching Gmail users. You can read more about Google’s enforcement statistics and see for yourself why verification is so critical. By confirming your DKIM is working, you ensure you’re on the right side of this security shift.
Advanced DKIM Management and Best Practices
Getting your first DKIM key set up is a fantastic first step, but it’s not a “set it and forget it” solution. To really master your email security and maintain top-notch deliverability, you need to think about long-term management. This is about adopting practices that keep your defenses strong as your business grows and email threats get more sophisticated.

These are the strategies that move you from a basic setup to a truly professional and resilient email authentication framework. They’re what protect your sender reputation and keep your emails landing in the inbox.
Why You Should Rotate Your DKIM Keys
One of the most important habits you can get into is DKIM key rotation. Treat your DKIM keys just like you would any important password—you wouldn’t keep the same one for years, right? Changing them periodically shrinks the window of opportunity for attackers if a private key ever gets compromised.
So, how often is enough? There’s no single rule, but a good baseline is anywhere from every six months to once a year. I once worked with an IT lead who built this task into his team’s quarterly security review. By making it a routine, it became a simple, predictable part of their workflow instead of a fire drill.
The process itself is pretty straightforward and designed to be seamless:
- Generate a new key pair using a new, unique selector (something like
q2-2024works well). - Publish the new public key in your DNS. Crucially, leave the old DNS record active for now.
- Update your email server or sending service to start signing new emails with the new private key.
- Wait until the TTL (Time to Live) on the old DNS record has passed before you remove it.
This “make before you break” method ensures there’s no interruption in your email authentication. All your emails continue to pass DKIM checks without a hitch.
Using Multiple Selectors for Different Email Streams
Here’s a pro tip for anyone sending different types of emails. If you’re sending transactional receipts from one platform, marketing newsletters from another, and support emails from a third, using multiple DKIM selectors is a huge advantage. You can assign a unique selector for each service (e.g., selector1-mailchimp, selector2-sendgrid).
This approach gives you incredible control and visibility. By isolating each email stream with its own selector, you compartmentalize your risk. If one platform’s key is ever compromised, it doesn’t tarnish the reputation of your other email channels.
It also makes troubleshooting a breeze. When deliverability problems pop up, you can immediately pinpoint which selector—and therefore which sending platform—is the source of the issue. You don’t have to guess or investigate your entire email operation.
Finally, think of DKIM as a cornerstone for even stronger email security. With DKIM properly in place, the next logical step is a full DMARC setup. DMARC uses your DKIM and SPF records to build a comprehensive shield, giving you the power to tell inbox providers precisely how to handle any unauthenticated mail claiming to be from your domain.
Even with the best of intentions, sometimes a DKIM setup just doesn’t work. Before you go down a rabbit hole of complex diagnostics, take a deep breath and check for the most common culprit: a simple typo.
I’ve seen it happen countless times—a copy-paste error in the DNS record or a mismatched selector name is usually the root of the problem. A quick double-check of the syntax can save you hours of frustration.
https://www.youtube.com/embed/Nyd9V93vGkQ
When an email fails verification, it almost always comes down to one of a few core issues. I once worked with a marketing team whose entire campaign was flagged as spam simply because their DNS provider was slow to update. The new DKIM record hadn’t propagated across the internet by the time the emails were sent out. Timing can be everything.
A Practical Diagnostic Checklist
When you see that dreaded dkim=fail result in an email header, resist the urge to start making random changes. The best approach is to work through a logical checklist to isolate the problem efficiently.
Start by running through these fundamental questions:
- Is the DNS record actually public? Use a third-party DKIM lookup tool, like the one from MXToolbox, to see what the rest of the world sees. If the tool can’t find your record, neither can receiving mail servers.
- Do the selectors match perfectly? The selector in your email’s header must be an exact match for the selector in your DNS record’s name (e.g.,
s1._domainkey.yourdomain.com). This is a very common point of failure. - Is the public key correct? Carefully compare the public key in your DNS record with the one your email provider gave you. Look for any extra spaces, missing characters, or line breaks that might have slipped in.
From my experience, the trickiest errors often happen when the private key signing the email doesn’t match the public key published in your DNS. This can happen if you rotate keys on your email platform but forget to update the corresponding TXT record in your DNS. Always update both simultaneously.
Digging Into Deeper Issues
If the basics all look correct, the problem might be more subtle. Some DNS providers, for example, have a habit of automatically wrapping long TXT records in extra quotation marks, which can corrupt the DKIM key. Others might split the key into multiple smaller strings, which can also cause validation to fail.
Finally, log into your sending service and confirm it’s actually configured to use the right private key and selector for your domain. Even a perfectly configured DNS record is useless if your sending platform is signing emails with the wrong key.
By working through these issues methodically—from simple typos to server-side configurations—you’ll find the root cause and get your emails passing DKIM checks in no time.
Got Questions About DKIM? We’ve Got Answers
Even a process that seems straightforward on the surface can have its tricky spots. Let’s walk through some of the most common questions that pop up when people are setting up DKIM for the first time.
I Already Set Up SPF. Do I Really Need DKIM, Too?
I get this one a lot. Think of it like this: SPF and DKIM are two different security guards checking different things.
SPF is like a bouncer checking the guest list. It verifies that the server sending the email is actually allowed to send on behalf of your domain. It’s all about the “who.”
DKIM, on the other hand, is like a tamper-proof seal on an envelope. It checks that the message itself—the actual content—hasn’t been messed with on its way to the recipient. This is all about the “what.” You really need both for solid protection. One confirms the sender’s location is legitimate, and the other guarantees the message is authentic.
By the way, getting both SPF and DKIM in place is the absolute bedrock for a strong DMARC policy. When mailbox providers see both checks pass, it’s a powerful signal that your emails are the real deal.
Are DKIM Selectors and Subdomains The Same Thing?
Nope, and this is a classic point of confusion. A subdomain is an actual address that lives under your main domain, like blog.yourdomain.com.
A DKIM selector is completely different. It’s just a name or a label you create—like s1 or google—that helps email servers find the right public key in your DNS records. The record looks something like s1._domainkey.yourdomain.com.
The beauty of selectors is that you can have multiple keys for different services (say, one for your marketing platform and another for your transactional emails) all under the same domain. No need to create a bunch of subdomains.
Can I Test My DKIM Record Before It Goes Live?
You sure can, and you absolutely should. The whole verification process is completely safe and won’t mess with your live emails.
You can go ahead and publish the DKIM TXT record in your DNS right now. Your emails won’t actually start getting signed with that key until you flip the switch inside your email service provider’s settings. This gives you a totally safe window to use online DKIM checkers to make sure everything is configured perfectly before you commit.